Tuesday, March 30, 2010

And One More...


This is a Ninja Squirrel. I painted it on a tshirt for Ben (though I think Gabe will want one too!). It makes him look totally bad ass. :)

I'm taking a little crafting hiatus - Ben and I are headed to Boston tomorrow to see my lovely friend Ashley! Then Ben is riding home with Gabe on Thursday (he's down there for work) and I get to spend until Saturday with Ashley - it's her birthday, so it should be tons of fun. :) Plussss I get to go to Trader Joe's, which I love immensely. yay!

On the project list for when I return:

Covers for the ugly pillows in our living room

This shirt (for me, yay!)

Something like this for Ben's room

More Freezer Paper Stenciling

Hi, My name is Jill and I am a pajama making addict.


Four more pairs of pajama pants made, and 4 more shirts painted to match them for my little guy. I didn't force him to model them this time, but they all look super cute! I really need to stop though - he only need so many sets of pajamas!

Garden Update


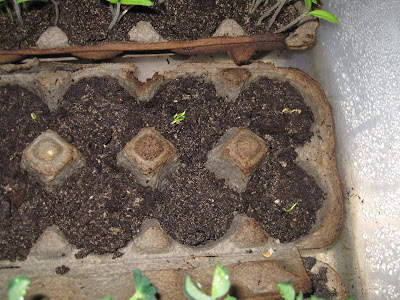
My banana peppers are sprouting, yay! I was a little worried about them, and they took almost 2 weeks to do anything, but there they are.


And everything else... Tomatoes at top, then peppers, peas and cucumbers. Looks like I will be replanting them soon!

Saturday, March 27, 2010

Freezer Paper Stenciling

This is one of my favorite crafts, because of how easy it is, and how great the results you get with it are.

First step is to buy yourself some freezer paper. It can usually be found in grocery or big box stores in with the saran wrap, parchment paper, foil, etc. Make sure you get the kind that has a waxy/plastic-y backing on one side.

Then you need to pick out a design. Silhouettes, or drawings without a lot of details are the easiest, and definitely the way to start out. Google-ing " X silhouette" is an easy way to do it, and if you are good with your printer, you can even feed the freezer paper right through it (making sure that you print on the flat, paper side). Or you can freehand a design, which is what I often do. The nice part is that YOU will be the one cutting out the areas you want to paint, so if you have to draw the thing a bunch of times to get it right, it's no big deal, you can just keep drawing over the same area.

Then you want to cut the design out. I like to use an Exacto Knife and a cutting mat, but scissors will work too if your design isn't too intricate. If you are cutting out an area that you want to keep (say, for instance, the middle of the letter O) it can be helpful to mark those with an X or something before you start cutting, so that you know to keep them.

After that, get out your iron and ironing board. Set the heat setting for the type of fabric you are ironing the stencil on to. If you really love your iron, you will probably want to put some type of thin cloth between the iron and the stencil, to ensure that you don't get any of the plastic-y stuff on your beloved iron. I do not do this. :) It only takes a few seconds to bond the stencil to the fabric. If you are adding the cut out area (like the middle of the letter O), it's better to iron on the outside part first, and then place the smaller sections on and iron them afterward, that way there's no worrying that something shifted when you were putting the iron down.


So this is where you should be thus far. This is a robot ironed on to a onesie. I've found that lighter fabrics work best... darker colors will need multiple coats of paint to hide the color of the fabric.

Now it's time to paint! I have a small set of brushes I use, plus a bunch of foam ones, which are great for covering larger areas. For paint, I use DecoArt NON-DIMENSIONAL fabric paint. It's like regular acrylic craft paint, except its specially designed for painting on fabric (so it won't come off the first time you wash it). There is also a fabric medium that you can add to acrylic, but it requires additional steps after the paint dries.

EDITED TO ADD: You'll want to make sure to put something between the layers of fabric so that it doesn't bleed through - I've found that cardboard works really well, and is usually readily available. :)

I like to remove the stencil as soon as I'm done painting. That way you don't have to worry about the paint on the stencil sticking to the paint on the fabric when it dries, and peeling off when you remove the stencil. The paint probably takes about 24 hours to really dry, but you can add details and such after about 10 minutes or so (or sooner, of course, if you want to blend colors).


Add some details (or not), and you're done! These can be washed with your normal laundry, just try to remember to wash them inside out, as they should last longer that way. :)


Monday, March 22, 2010

A New Undertaking


I used to be a plant killer. Not intentionally, I just had a seriously black thumb for some reason. Shortly after we moved to Vermont though, Gabe's mom gave me a clipping from a Christmas Cactus, which has now become this great big plant that hangs over my kitchen sink, and blooms year round.

Last summer, I tried a tomato plant - my first foray into edible gardening. Last year was also the year of the tomato blight. Need I say more? It was very discouraging.

I decided to try again this year though, and to do it from the beginning, starting my own seeds and everything.

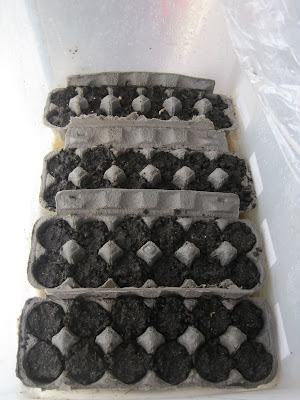
Top to Bottom: Cucumbers, Peas, Banana Peppers and Cherry Tomatoes. I garnered some information from the lovely internet to get me started - planting multiple seeds in each "cell" and thinning when you replant, keeping the soil moist and warm, and somewhere sunny. This is the amazing "greenhouse" I concocted:


Clear Rubbermaid storage container that we had in the basement, plus saran wrap and duct tape. Plus an un-pictured spray bottle to keep it all moist.

Amazingly, it all seems to be working pretty well! The cucumbers especially are coming up gangbusters. The top picture was taken 2 days after I planted the seeds, and you can already see sprouts. They're doing even better now, the only thing that hasn't sprouted are the banana peppers - maybe it's not warm enough for them?

So far, this whole venture has cost me about $7 for the seeds. Everything else was stuff we had around the house (even the dirt was left over MooDoo from last year). I plan on replanting into recycled containers (milk jugs, juice bottles, etc.), so other than needing more dirt, the future expenses should be limited. This coupled with our CSA membership this year should keep us well fed for the summer. :)

Oatmeal Raisin White Chocolate Chip Cookies


These could very well be the best cookie in the entire world. I don't make them too often, because when I do make them, I have a hard time not eating them all. Notice how the picture is only of one cookie? I wasn't trying to be artsy. By the time I realized that I should take a picture, there were very few of these bad boys left.

I just use this recipe, and add in a cup of white chocolate chips.

You should go make some right now. :)

Tuesday, March 16, 2010

Inspiration & Sewing

I started sewing, sort of, when I was little. I used to take old scraps of fabric my mom had and hand sew little crude dresses for my dolls. Then in high school, I took a sewing class, and used a machine for the first time, making pillows, pajama pants, easy stuff like that. In college, I used a friend's machine occasionally, and made myself a couple of very simple skirts. I always really liked sewing, but for some reason never jumped head-long into it.

Then, this past fall, I bought myself a sewing machine. It sat in my craft room for a long time, untouched. I think it intimidated me. I recently felt motivated though, by this:


It's a quilt that was made by the woman who lived across the street from me growing up, and given to me (and Ben) for my baby shower. It means so much to me, and I realized that I want to create more things like this, both for Ben and to give to other people.

I'm not quite bold enough to start with a quilt (soon though, perhaps, as I'm sick of the one we have in the master bedroom)... I went over to a friend's house about a week ago, and she was able to help me with three projects - pajama shorts for my neighbor's daughters birthday, and two pairs of pajama "Capri pants" for Ben (note to self, buy more fabric next time).


And yes, I did paint the shirts to match. I love freezer paper stenciling! I'll post on that soon.

There will definitely be more sewing projects in the future, especially since I have a dedicated crafting space in our basement now.